Wednesday, June 18, 2014

Read Image file from oracle 10g forms


 step 1. connect your terget user and run the webuitl script using sqlplus or sqlplusw located at
        %ORACLE_HOME%\forms\create_webutil_db.sql


step 2. Download jacob.dll and jacob.jar file
        Download location https://googledrive.com/host/0B5DZvtSmSXRITmREUTQ1ZmxYb0U/jacob_18.zip

step 3. Place the jacob.dll file into %ORACLE_HOME%\forms\webutil and jacob.jar file into
        %ORACLE_HOME%\forms\java directory.


step 4. configer the "formsweb.cfg" file under %ORACLE_HOME%\forms\server
        as like as the following

    [lms]
    form=E:\LMS\Forms\LMS_TEMPLATE.fmx
    userid=lms/lms@orcl
    width=100%
    height=100%
    background=/forms/formsdemo/images/blue.gif
    WebUtilArchive=frmwebutil.jar,jacob.jar
    WebUtilLogging=off
    WebUtilLoggingDetail=normal
    WebUtilErrorMode=Alert
    WebUtilDispatchMonitorInterval=5
    WebUtilTrustInternal=true
    WebUtilMaxTransferSize=16384
    baseHTMLjinitiator=webutiljpi.htm
    baseHTMLjpi=webutiljpi.htm
    archive_jini=frmall_jinit.jar,demo.jar,jacob.jar
    archive=frmall.jar,demo.jar,jacob.jar
    lookAndFeel=oracle


step 5. configer webutil.cfg file by changing two line at the bottom of this page

    transfer.database.enabled=TRUE
    transfer.appsrv.enabled=TRUE


step 6. Open form builder and create a form with a push button and a image field.

step 7. attach webutil.pll in the pl/sql libraries and webutil.olb in the object library and
        compile the pl/sql library
        Expand the object library copy the "webutilconfig" and "webutil" in the form.


step 8. attach webutil.pll in the "attached libraries" under form module


step 9. Create the following when-button-pressed trigger under push button.

    DECLARE
    v_file VARCHAR2(4000) := client_get_file_name ('','','jpeg Files/*.jpg',
    'select a image', open_file,TRUE);
    it_image_id ITEM:=FIND_ITEM('CONTROL.CUSTOMER_IMAGE');
    BEGIN
    client_image.read_image_file(v_file,'',it_image_id);
    END;


step 10. compile and Run the form. Hope your form will run correctly.

If you want to see the video tutorial follow the link
http://youtu.be/yUWzuEp4blE
Or
Click here

Tuesday, May 20, 2014

Run oracle 10g forms on internet explorer

Assume that you have installed ORACLE DEVELOPER SUITE 10G after installing ORACLE 10G DATABASE. To run your forms on internet explorer you can follow the steps.

step 1. Make sure that the oracle database and developer suite network connectivity is ok if not

copy tnsnames.ora file from %oracle_home%\product\10.2.0\db_1\network\ADMIN directory

and past it into %DevSuiteHome%\NETWORK\ADMIN directory


step 2. Open the form builder and create a sample form by connecting hr schema.


step 3. Run the HTTP listener if alrady not started (OC4J Instance). Compile and run the form.


  Note: If the Error is appear "Internet Explorer has stopped working.........."

step 4. Mate sure Oracle jinitiator alrady installed, if not
        Goto %DevSuiteHome%\jinit and double click the jinit icon, hereupon jinitiator will
        install on your conputer


step 5. Run the form. If the above error is appear again

step 6. Copy JVM.dll file from %DevSuiteHome%\jdk\jre\bin\server


and replace it to C:\Program Files (x86)\Oracle\JInitiator 1.3.1.22\bin\hotspot directory

step 7. Run the form again. Hope your form will run correctly.

You  also see my video tutorial from
https://www.youtube.com/watch?v=q-o1CaNDgdg
Or Click here
Please write a comment after watching my tutorial or video

Saturday, May 10, 2014

Create a hyperlink or HTML Link in oracle 10g forms


 1) Step 1: Download hyperlink.jar or demo.jar for add a hyperlink in your oracle forms.                 
           https://googledrive.com/host/0B5DZvtSmSXRITmREUTQ1ZmxYb0U/demo.jar
                                                                       or
                                                                  Click here

2) Step 2: Place the jar file into %ORACLE_HOME%/forms/java Directory


3) Step 3: Update the formsweb.cfg file. In the %ORACLE_HOME%/forms/server Directory add this jar file                                  
                                       Example:
                                       archive_jini=frmall_jinit.jar,......,demo.jar
                                       archive=frmall.jar,........,demo.jar


4) Step 4: Create or Open a sample form with form builder

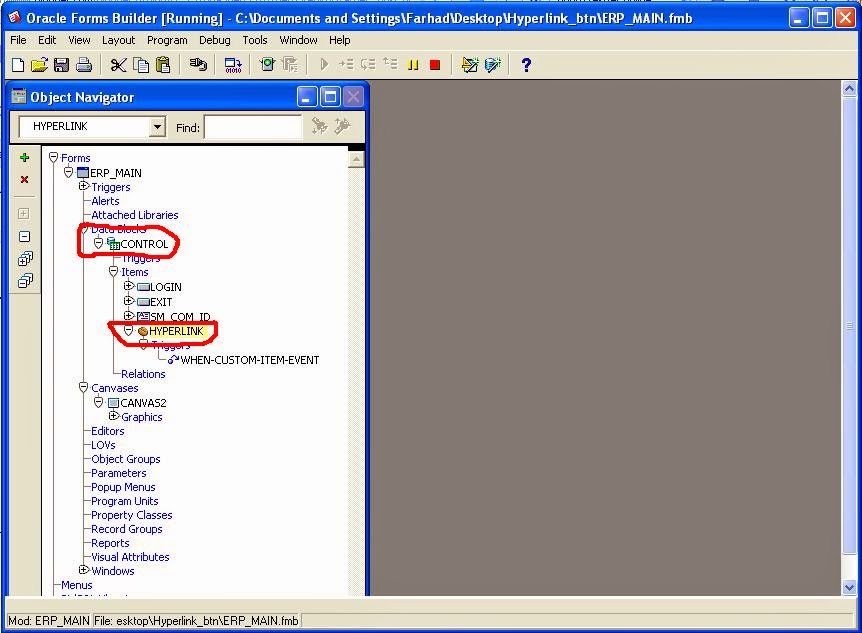
5) Step 5: Create a manual block named control and take a bean item named hyperlink into it.


6) Step 6: Write the folloing code under WHEN-NEW-FORM-INSTANCE trigger

BEGIN
    FBean.Register_Bean('control.hyperlink',1,'oracle.forms.demos.beans.Hyperlink');
    FBean.Invoke('control.hyperlink',1,'setLabel','www.azizgroupbd.com');
    FBean.Enable_Event('control.hyperlink',1,'actionListener',true);
END;

7) Step 7: Write the folloing code in WHEN-CUSTOM-ITEM-EVENT trigger under bean item

                Web.Show_Document('http://azizgroupbd.com','_blank');

8) Step 8: Compile the form

9) Step 9: Run the form

10) You can watch this video tutorial from this link
https://www.youtube.com/watch?v=W1arSfH3nqw
or  Click here

Friday, May 9, 2014

How can you create a rollover or oval button in oracle 10g forms


1) Step 1: Download jar file for rollover button                  
                                        Click here demo.jar

2) Step 2: Place the demo.jar file into %ORACLE_HOME%/forms/java Directory  


3) Step 3: Update the formsweb.cfg file. In the %ORACLE_HOME%/forms/server Directory add this jar file                                   
                                       Example:
                                       archive_jini=frmall_jinit.jar,......,demo.jar
                                       archive=frmall.jar,........,demo.jar


4) Step 4: Open a sample form with form builder 
5) Step 5: Create 3 button with separate name
6) Step 6: In the property palate of this button set 
                                       implementation class = oracle.forms.demos.enhancedItems.RolloverButton
7) Step 7: Add (, ), ( ) symbol left or right or both side in the button label property for rounded button.  
                                      e.g.   (Add new  or  Save) or (Close) 


8) Step 8: Compile the form
9) Step 9: Run the form 


If you want to see video tutorial to create a rollover button, follow this link
http://youtu.be/2gAoVNXieCg
or Click here 

Insert a Calender in oracle 6i forms

How can you set a calendar on oracle forms 6i
=====================================
Step 1: Download forms 6i demos with library from

https://googledrive.com/host/0B5DZvtSmSXRITmREUTQ1ZmxYb0U/forms6idemos.zip

copy the stndrd20.olb and calendar.pll file from forms6idemos\win32\pmbf\6_0_8_8\demo\forms location and past it

Desired forms directory

Step 2: Add stndrd20.olb desired form module and expand the library then duble click into the COMPONENTS tab
drag and drop the calendar into the module.When a message arise then press copy.

Step 3: In the programm unit Add a package spacification named date_lov and write the following code:
================================================================================
package date_lov is
last_lov_date number(2);
current_lov_date date;
date_lov_return_item varchar2(80);

lov_title varchar2(80);
lov_auto_confirm boolean;
lov_auto_skip boolean;

weekend_highlight boolean;
weekend_day1 number;
weekend_day2 number;

procedure display_cal(display_date in date);
procedure date_click;
procedure get_date (display_date in date,
return_item in varchar2,
v_x_pos in number := 0,
v_y_pos in number := 0,
v_title in varchar2 := 'Date List of Values',
v_ok in varchar2 := 'OK',
v_cancel in varchar2 := 'Cancel',
v_highlight in boolean := TRUE,
v_autoconfirm in boolean := FALSE,
v_autoskip in boolean := FALSE);
end;

Step 4: In the programm unit Add a package body named date_lov and write the following code:
==========================================================================

package body date_lov is

procedure set_day_labels
is
begin
-- if November 8, 1996 is the fifth day of the week, then
-- display the labels in ISO style with Monday as
-- the first day of the week
-- else November 8, 1996 is the sixth day of the week, then
-- display the labels in American style with Sunday as
-- the first day of the week

if to_char(to_date('11/08/1996','mm/dd/yyyy'),'d') = '5' then
weekend_day1 := 6;
weekend_day2 := 7;
copy(to_char(to_date('11/04/1996','mm/dd/yyyy'),'Dy'),
'date_control_block.day_label1');
copy(to_char(to_date('11/05/1996','mm/dd/yyyy'),'Dy'),
'date_control_block.day_label2');
copy(to_char(to_date('11/06/1996','mm/dd/yyyy'),'Dy'),
'date_control_block.day_label3');
copy(to_char(to_date('11/07/1996','mm/dd/yyyy'),'Dy'),
'date_control_block.day_label4');
copy(to_char(to_date('11/08/1996','mm/dd/yyyy'),'Dy'),
'date_control_block.day_label5');
copy(to_char(to_date('11/09/1996','mm/dd/yyyy'),'Dy'),
'date_control_block.day_label6');
copy(to_char(to_date('11/10/1996','mm/dd/yyyy'),'Dy'),
'date_control_block.day_label7');
else
weekend_day1 := 1;
weekend_day2 := 7;
copy(to_char(to_date('11/03/1996','mm/dd/yyyy'),'Dy'),
'date_control_block.day_label1');
copy(to_char(to_date('11/04/1996','mm/dd/yyyy'),'Dy'),
'date_control_block.day_label2');
copy(to_char(to_date('11/05/1996','mm/dd/yyyy'),'Dy'),
'date_control_block.day_label3');
copy(to_char(to_date('11/06/1996','mm/dd/yyyy'),'Dy'),
'date_control_block.day_label4');
copy(to_char(to_date('11/07/1996','mm/dd/yyyy'),'Dy'),
'date_control_block.day_label5');
copy(to_char(to_date('11/08/1996','mm/dd/yyyy'),'Dy'),
'date_control_block.day_label6');
copy(to_char(to_date('11/09/1996','mm/dd/yyyy'),'Dy'),
'date_control_block.day_label7');
end if;
end set_day_labels;

procedure display_cal(display_date in date)
is
first_date date;
first_dow number;
last_dom number;
loop_begin number;
loop_end number;
current_date number;
day_label number := 1;
BEGIN
current_lov_date := display_date;
current_date := to_number(to_char(display_date,'dd'));
first_date := to_date('01-'||to_char(display_date,'mon-yyyy'),'dd-mon-yyyy');
first_dow := to_number(to_char(first_date,'d'));
last_dom := to_number(to_char(last_day(display_date),'dd'));
copy(to_char(display_date,'fmMonth YYYY'),
'date_control_block.display_mon_year');

loop_end := first_dow - 1;

for i in 1..loop_end loop
set_item_property('date_button'||to_char(i), displayed, property_false);
end loop;

loop_end := last_dom + first_dow - 1;

for i in first_dow..loop_end loop
if get_item_property('date_button'||to_char(i), displayed) = 'FALSE' then
set_item_property('date_button'||to_char(i), displayed, property_true);
end if;
copy(to_char(day_label), 'date_button'||to_char(i));
if day_label = current_date then
set_item_property('date_button'||to_char(i), visual_attribute, 'date_selected_va');
last_lov_date := i;
elsif to_char(to_date(to_char(day_label)||'-'||
to_char(display_date,'mon-yyyy'),'dd-mon-yyyy'),'d')
in (weekend_day1,weekend_day2) and weekend_highlight = TRUE then
set_item_property('date_button'||to_char(i), visual_attribute, 'date_weekend_va');
else
set_item_property('date_button'||to_char(i), visual_attribute, 'date_normal_va');
end if;
day_label := day_label + 1;
end loop;

if last_dom + first_dow < 37 then
loop_begin := last_dom + first_dow;
loop_end := 37;
for i in loop_begin..loop_end loop
set_item_property('date_button'||to_char(i), displayed, property_false);
end loop;
end if;
end display_cal;

procedure get_date (display_date in date,
return_item in varchar2,
v_x_pos in number := 0,
v_y_pos in number := 0,
v_title in varchar2 := 'Date List of Values',
v_ok in varchar2 := 'OK',
v_cancel in varchar2 := 'Cancel',
v_highlight in boolean := TRUE,
v_autoconfirm in boolean := FALSE,
v_autoskip in boolean := FALSE)
is
date_window window;
begin
date_window := find_window('date_lov_window');

-- set date lov window position
set_window_property(date_window, position, v_x_pos, v_y_pos);

-- set date lov window title
set_window_property(date_window, title, v_title);

-- set OK button label
set_item_property('date_control_block.ok_button',label,v_ok);

-- set Cancel button label
set_item_property('date_control_block.cancel_button',label,v_cancel);

-- set date lov auto confirm flag
lov_auto_confirm := v_autoconfirm;

-- set date lov auto skip flag
lov_auto_skip := v_autoskip;

-- set weekend highlight flag
weekend_highlight := v_highlight;

date_lov_return_item := return_item;
set_day_labels;
display_cal(display_date);
go_item('date_control_block.OK_BUTTON');
end get_date;

procedure date_click
is
begin
if to_char(date_lov.current_lov_date,'d') in (date_lov.weekend_day1, date_lov.weekend_day2) and
weekend_highlight = TRUE then
set_item_property('date_button'||to_char(date_lov.last_lov_date),
visual_attribute, 'date_weekend_va');
else
set_item_property('date_button'||to_char(date_lov.last_lov_date),
visual_attribute, 'date_normal_va');
end if;

set_item_property(name_in('system.trigger_item'),
visual_attribute, 'date_selected_va');
date_lov.last_lov_date := substr(name_in('system.trigger_item'),
instr(name_in('system.trigger_item'),'.')+12);

date_lov.current_lov_date := to_date(name_in(name_in('system.trigger_item')) || '-' ||
to_char(date_lov.current_lov_date,'mon-yyyy'),'dd-mon-yyyy');

if date_lov.lov_auto_confirm = TRUE then
copy(to_char(date_lov.current_lov_date), date_lov.date_lov_return_item);
go_item(date_lov.date_lov_return_item);
if date_lov.lov_auto_skip = TRUE then
next_item;
end if;
end if;
end date_click;
end;

Step 5: Create a text item(if needed) and push button in the form that will execute the calendar.
in the push button write the following code in WHEN-BUTTON-PRESSED trigger
===========================================================================================================================

declare
xp number;
yp number;
begin
xp:=get_item_property('from_date',x_pos);
yp:=get_item_property('from_date',y_pos);
date_lov.get_date(sysdate,'EMPLOYEE.from_date',240,60,'From Date','OK','Cancel',TRUE,FALSE,FALSE);
END;

[note:change block name like here employee is block and item name like from_date;]

compile the form and run...........

If you want to see a video tutorial click the following link

https://www.youtube.com/watch?v=oDua6VQQJpo